Showing posts with label garden. Show all posts

Wednesday, 22 August 2012

10 Strange Things You Can Compost


When most people think of composting they think food scraps, but there is so much more that you can add. Once you read this list you'll find your self standing over the bin asking yourself, "Could I compost this?" and chances are pretty good that you can.

However, a few things to avoid composting are meat, items soiled with human fluids and diseased plants.


  1. Skunked beer, ancient candy bars, expired protein bars 

  2. Cat fur, dog hair, and nail clippings. Just try not to keep your nail clippings in a jar, that will probably freak people out. If it's in the vacuum, it can go in the compost.

  3. Your hair – you could even bring the clippings home from your hair dresser. If you don't mind some stares while you stroll around with bags of hair of course.

  4. Bills, because shoving bills in with melon rinds and egg shells is way more satisfying!

  5. Old fish food and stale catnip 

  6. Jell-O (gelatin) 

  7. Bamboo products such as spoons, chopsticks, etc. 

  8. Wood fire ashes from grill or fire-place (also from smoking fish and other meats) 

  9. Crepe paper streamers. Tear it up like it's 1999 and then tear them down.

  10. Small pets that have died, like goldfish (Not recommended, but possible.)


What strange things can you add to your own compost?
Native Plants Make For a Successful Garden


Gardening doesn't have to be all finicky with companion planting and moon phases, it can be simple and enjoyable. The easiest way to keep a low maintenance garden is to choose plants native to your region, and Alberta has some great selections for a beautiful garden year round.


Flowers
Brown-Eyed Susan

These large flowers can be found in Alberta's Prairies, Foothills and the Rocky Mountains in sunny, dry locations such as dry open meadows and hillsides. They attract butterflies, bees and birds and grow quickly with blooms from June to early August.


Forget Me Nots

These cheery little blooms can be found nearly anywhere in Alberta so long as they have a sunny, sheltered and well drained area. The showy flowers have a long bloom time from May to August and make for a great boarder at the front of a flower bed.


Giant Hyssop

This large leafy plant produces large, showy blue flower spikes that attract birds, bees and butterflies. It prefers partially shaded, well drained areas typically growing in moist open meadows and on the edge of aspen woodlands.


Prairie Crocus

These slow growers have a short bloom time but are still a welcome sight for many as it means spring has sprung in Alberta. Their little purple flowers generally poke up through the snow in late march and by April have transformed into fluffy seed heads that linger until summer. These flowers prefer well drained sunny meadows and hillsides.


Red Columbine

These bright red and yellow blooms and a perfect garden plant growing quickly and being less particular about their growing conditions. These showy blooms attract butterflies and hummingbirds  and provide great fall colour.


Shrubs
Alberta Wild Rose

Alberta's provincial flower can also be a great addition to your garden! This small, woody shrub provides great colour all the way through to the fall and forms edible rosehips.


Yellow Twig Dogwood

This small deciduous shrub is great for filling space and provides great winter colour with it's bright yellow twigs. It looks fantastic when mixed with Red Osier Dogwood.


Red Osier Dogwood

This fast growing shrub is great provides great winter colour when paired with Yellow Twig Dogwood. In the fall it's leaves turn a deep red, making this a great year round garden plant.


Bearberry

This low, slow grower makes for an interesting ground cover with it's small purple-white flowers and bright red berries. It tolerates acidic soils that can be caused by fallen pine needles.


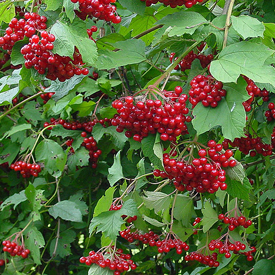
Highbush Cranberry

This fast growing shrub can grow up to 5 metres high and clusters of white blooms in late June. It also produces an edible, bright red fruit that often hangs on through the winter.


Trees

White Spruce

These large, dense spruce trees can grow up two 16 feet and are great shelterbelt plants but can even be pruned into hedges if height is an issue.


Trembling Aspen

These large deciduous trees have small roundish leaves that "tremble" in the wind creating a relaxing atmosphere. The small leaves turn a bright yellow in the fall.


Balsam Fir

The balsam fir the the only fir tree native to Northern regions and is easily distinguished from spruce by it's flat needles. Balsam Fir are commonly used by Christmas tree growers for their fast and dense growth.


Balsam Poplar

This large deciduous tree has leaves that turn yellow in the fall. If seedlings are grown from a cutting, and are a male clone the do not produce the white fluff that is normally seen.


Schubert Chokecherry

This small ornamental, fruit bearing deciduous tree  has maroon coloured leaves and produces dark red edible berries. It is great for providing long season colour in any garden.

Friday, 27 July 2012

How To Make Homemade Weed Killer


Although many weeds are just plants out of place, it doesn't make them any less frustrating. Weeds grow in ideal locations such as flower beds and compete with other plants for nutrients.


Spraying harsh chemical weed killers may sound like the only solution to your weed problems, but there are other options for those who would prefer a safer, more natural approach.

(Image: Houzz)

For Small Problem Areas
1. Cut the top off of a large juice bottle or milk jug.
2. Place the cut top around the weed that needs to be taken care of. 
3. Pour a mixture of vinegar and lemon juice over weed. Avoid using this on your lawn, as it could temporarily kill grass.

For Large Problem Areas
1. Fill a watering can with vinegar and a little bit of lemon juice. 
2. Pour over the necessary area and after a day or two you will see amazing results. 
3. If you want to ensure that no other weeds grow in sprinkle table salt over the area afterwards. Be careful where your salt goes and ensure it's not an area you would like to plant in the future as salt will kill everything and make the soil a harsh environment for future plants.

Friday, 20 July 2012

How To Clean Your Garden Tools


When you think of maintaining your tools, your garden tools are probably not the first ones that come to mind. All tools, regardless of the job need a little maintenance to keep them working properly.

(Image: iStock)

Follow these steps to keep your tools in tip top shape, and prevent weeds and disease from spreading in your garden.

Remove Dirt: Wet soil can cause your tools to rust. Use a stiff bristle brush and water to clean your tools after every use. The brush will help remove any stubborn dirt from metal parts.

Dry your tools: Dry tools with a rag or let them air dry in the sun.

Remove rust: If you find rust spots, cover the area with a lubricating oil such as WD-40, and scrub it with a wire brush. Wear garden gloves to prevent rust from getting onto your skin to avoid irritation. If this method is not successful in removing the rust, use a paste of one part lemon juice and one part baking soda. Cover the rust spots with the paste and allow it ti sit for 10 minutes. The paste helps dissolve the rust, allowing you to easily wipe it away with a cloth.

Repair handles: Check wood handles for splinters, cracks and roughness. Smooth problem areas with a medium grit sandpaper or emery cloth. If the handles are extra rough try rubbing against the grain first.

Sharpen up: Sharpen dull blades on any tools used for cutting or digging. The more you use your tools, the duller they will become. Use a metal file to sharpen edges at a 45ยบ angle. Making long, smooth strokes in one direction. 

Oil tools: Blot lubricating oil onto a clean rag and rub a light coat of oil onto the surfaces of your tools. This will prevent wood from absorbing water or cracking, and protect metal parts from corroding. Fiberglass or composite does not need to be treated with oil.

Store: Keep your tools in a warm, dry place to prevent further corrosion. Avoid storing tools on the ground.

Friday, 1 June 2012

Build a Simple Raised Vegetable Garden Box


Raised garden beds are one of the easiest ways to start a vegetable garden. This 7ft x 5ft garden box is made from cedar which is naturally rot resistant and doesn't require staining, sealing or painting. However you can if you would like to match your homes decor.

When you plant the right foods the amount you spent on the materials can be quickly offset by savings at the grocery store, not to mention fresh fruits and vegetables from straight from the garden just taste that much better.

Difficulty       Time            Cost
Easy               20 Minutes       About $40

Shopping List
4 8ft cedar fence boards4 6ft cedar fence boards
1” screws
2” screws

Tools
Safety Glasses
Pencil
Hearing Protection
Drill
Circular Saw or Mitre Saw
Tape Measure

Cut List
4 1x6 cedar fence boards at 60” (end panels)
4 1x8 cedar fence boards at 84” (side panels)
8 12” from cut fence boards


Step 1: Prepare Your Location

Select a flat, level and sunny location where you would like to place your garden box. Most vegetables like between 6 to 8 hours of sunlight so it’s best to pick a location that receives a lot of sun. Measure out the area of your garden box and lay down weed fabric. Secure weed fabric in place.


Step 2: Cut Panels

Cut 1-foot off the end of each fence board so that you have four 7-foot boards, four 5-foot boards and eight 1-foot pieces.


Step 3: Build Side and End Panels

Make sure that you attach the 1-foot sections to the rough side of your fence boards as this will be the inside of your box.


Flip your boards over and using 1” screws attach with two 1-foot pieces at either end of your 7-foot boards, placed about 1-foot from the edge of the boards. 


Repeat this step with the remaining 6 boards, attaching in pairs.


Step 4: Lay Out Your Box

Now that your sides are built, lay each one in place for the garden box. Ensure that you have a slight over lap of weed fabric. 


Step 5: Attach Panels

Butt together the ends of each side up and attach using 2” screws. Add screws to the top, middle and bottom of each end.


Step 6: Finish the Box


Lightly sand any rough edges and corners to smooth away splinters. Fill with soil, either your own mixture or store bought garden soil depending on your preference.